🛒 Products
The Products element in FormNX turns any form into a simple online store. Instead of asking customers to type what they want, you show them a product catalog right inside your form — with images, prices, descriptions, and options like size or color.
Customers browse the products, pick their variants, choose how many they want, and add everything to a cart. FormNX adds up the cart total for you, applies tax, shipping, and any discount code the customer enters, and collects the payment — all in one form, without any coding.
The Products field is available exclusively for Pro subscribers. Upgrade to a Pro plan to unlock this feature.
If you've been building order forms by hand — a dropdown for the item, a number field for quantity, and a calculation field to work out the total — the Products field replaces all of that with one element.
🎯 What You Can Do With the Products Field
- Sell physical products, digital downloads, tickets, or services from a form.
- Show product photos, short descriptions, and full details in a clean product card.
- Offer options such as size, color, or flavor using variant groups — with its own price and stock status for every combination.
- Limit how many units one person can order.
- Mark items as out of stock without deleting them.
- Let customers switch between 1, 2, or 3 column layouts while they browse.
- Charge tax and shipping, offer free shipping above a set amount, and run discount codes.
- Take the full cart total as a single payment using your connected online payment gateway.
📌 How to Add the Products Field to Your Form
Follow these simple steps:
- Open the Form Builder.
- On the left hand side, you'll see the Elements section.
- Find the Products element.
- Drag and drop the element onto your form OR click on the element to add it automatically.
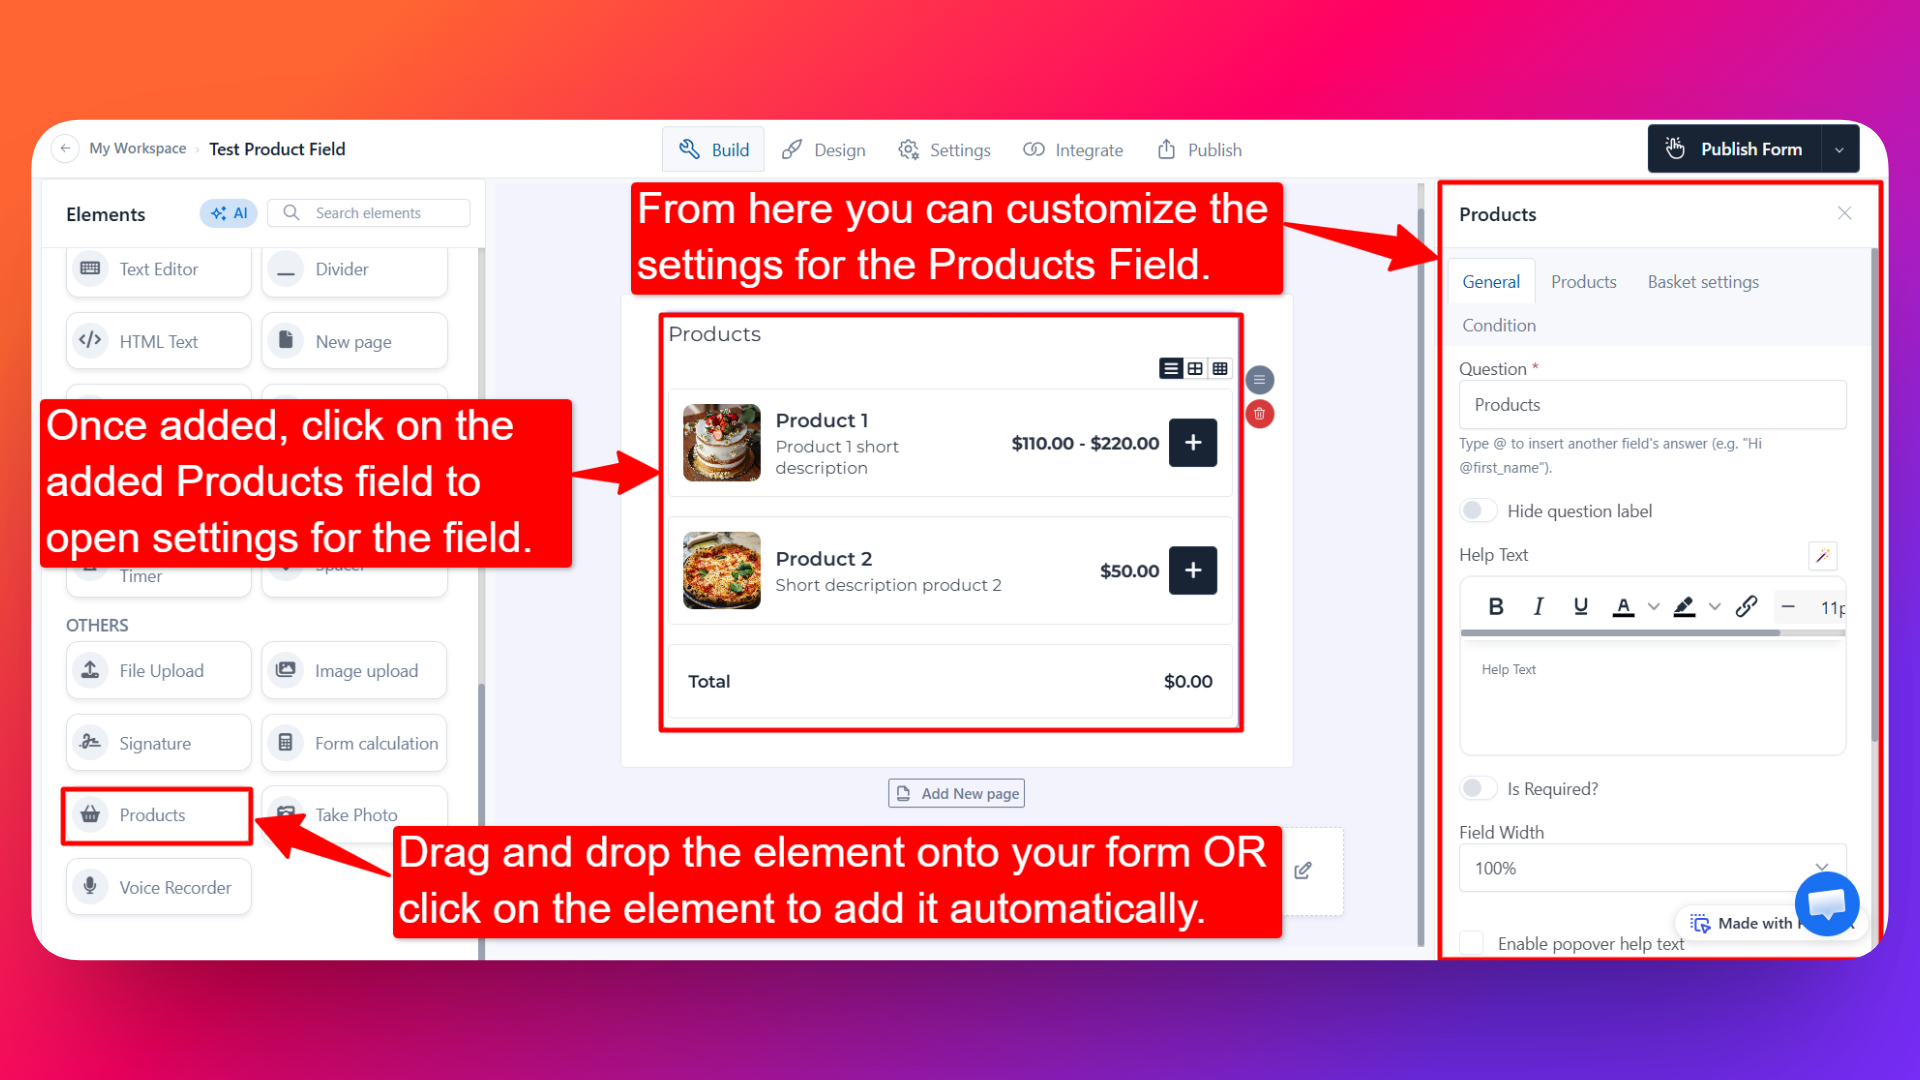
Once added, the Products field will appear in your form layout, ready to be customized.
To open its settings, click on the added Products element in your form. The configuration panel opens on the right hand side and shows three tabs:
| Tab | What you set here |
|---|---|
| 1. General | The question label, help text, and how the field looks on the form. |
| 2. Products | Your actual products — titles, prices, images, stock, and variants. |
| 3. Basket Settings | Currency, layout, tax, shipping, and discount codes for the whole cart. |
We'll walk through each tab below.
⚙️ Tab 1 — General Settings
This tab controls how the field is presented to your customers.
1. Question Label ✏️
- Add the question or heading customers will see above your products.
- Example:
- "Choose your items"
- "What would you like to order?"
- "Select your tickets"
2. Help Text 📝
- Add a short instruction below the label to guide customers.
- Example: "Click a product to see sizes and add it to your cart."
3. Is Required ✅
- Enable this to make the field mandatory.
- Customers won't be able to submit the form unless they add at least one product to the cart.
- Recommended for order forms, so you never receive an empty order.
4. Hide Question Label 🙈
- Enable this option to hide the question label while keeping the product catalog visible.
- Useful when you've already introduced the products with a heading or text block above.
5. Field Width 📐
- Adjust the width of the field to control how it appears on the form.
- Products look best at full width, since that gives your product cards and images enough room to breathe.
6. Popover Help Text 💡
- Enable this option to show your help text inside an info icon next to the field.
- When customers click the info icon, the popover appears with the help text you added.
- Keeps your form clean while still giving shoppers extra guidance when they need it.
7. Field Name 🏷️
- Add a unique field name (used internally for integrations, exports, and conditional logic).
🧺 Tab 2 — Products
This is where you build your catalog.
Click the Add Product button. A product card opens with two tabs — General and Variants.
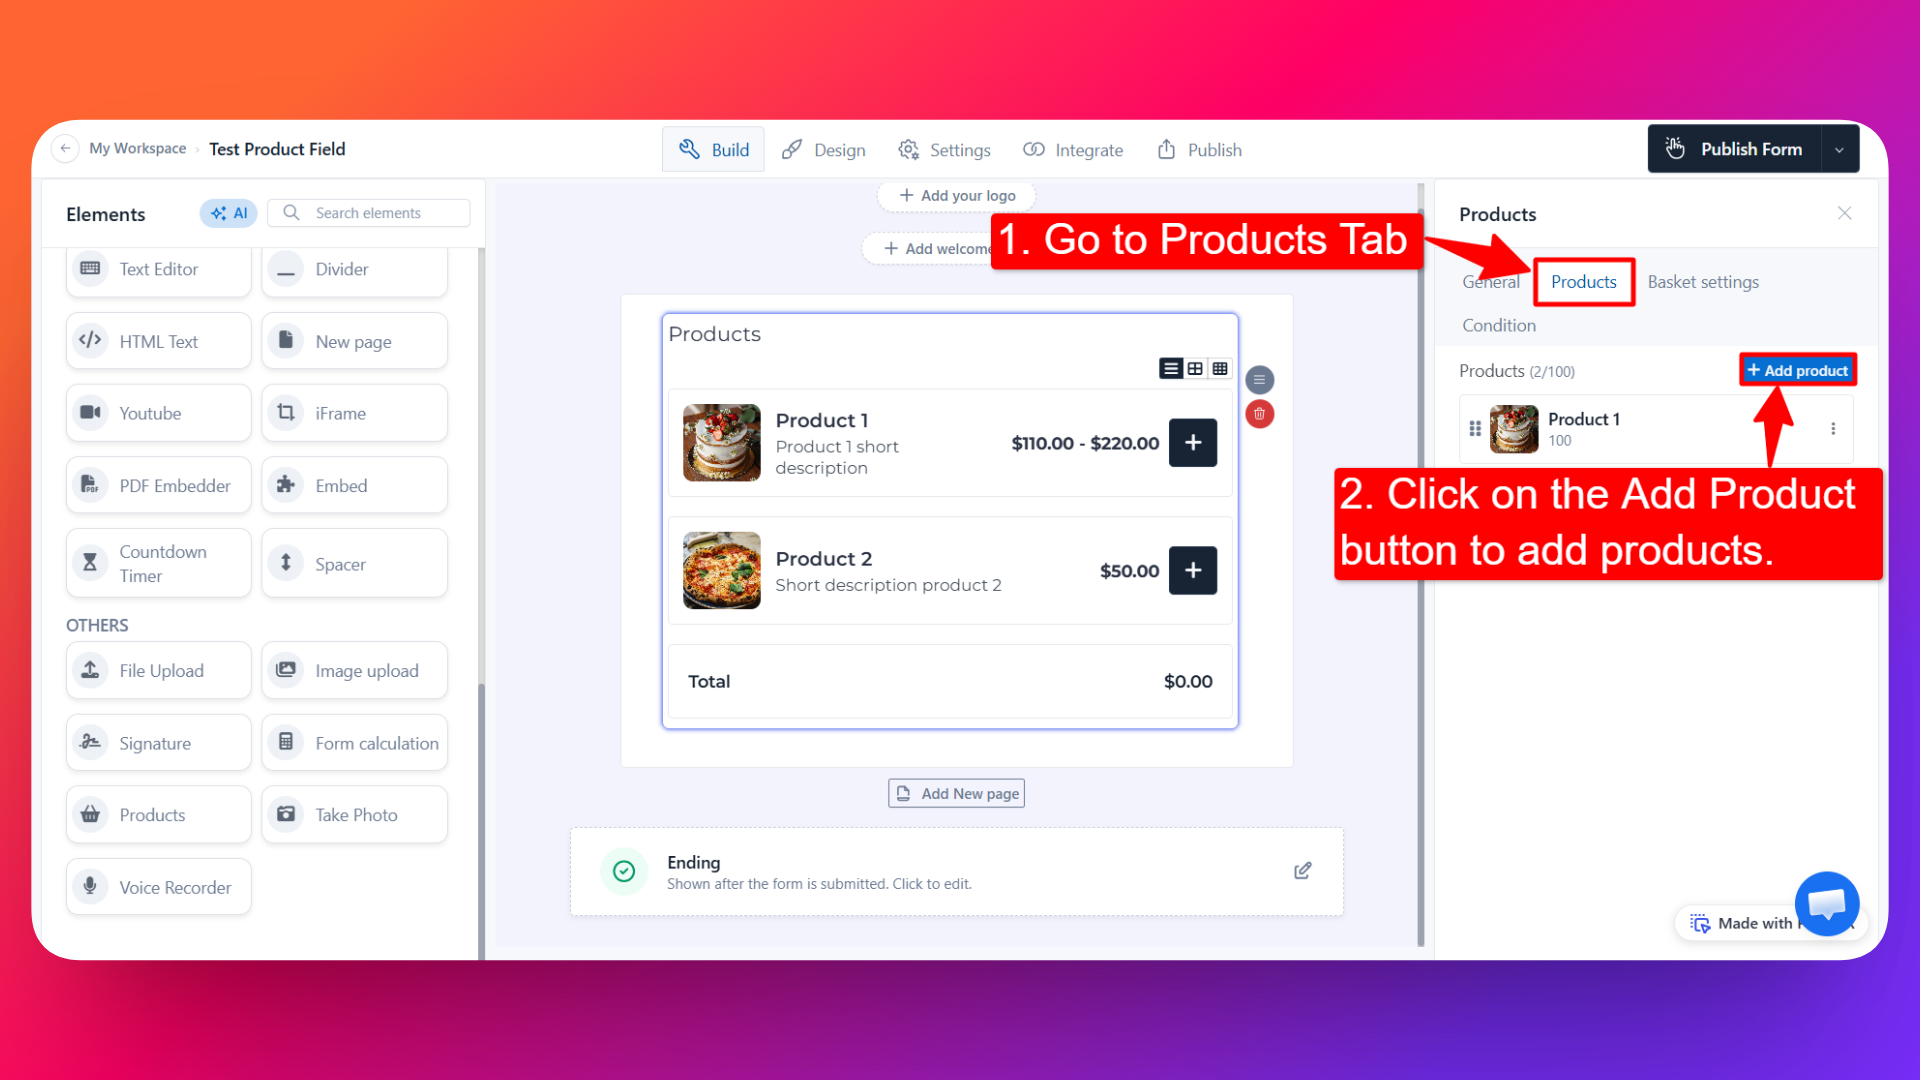
📦 General Tab (Product Details)
Fill in the details of the product you're selling:
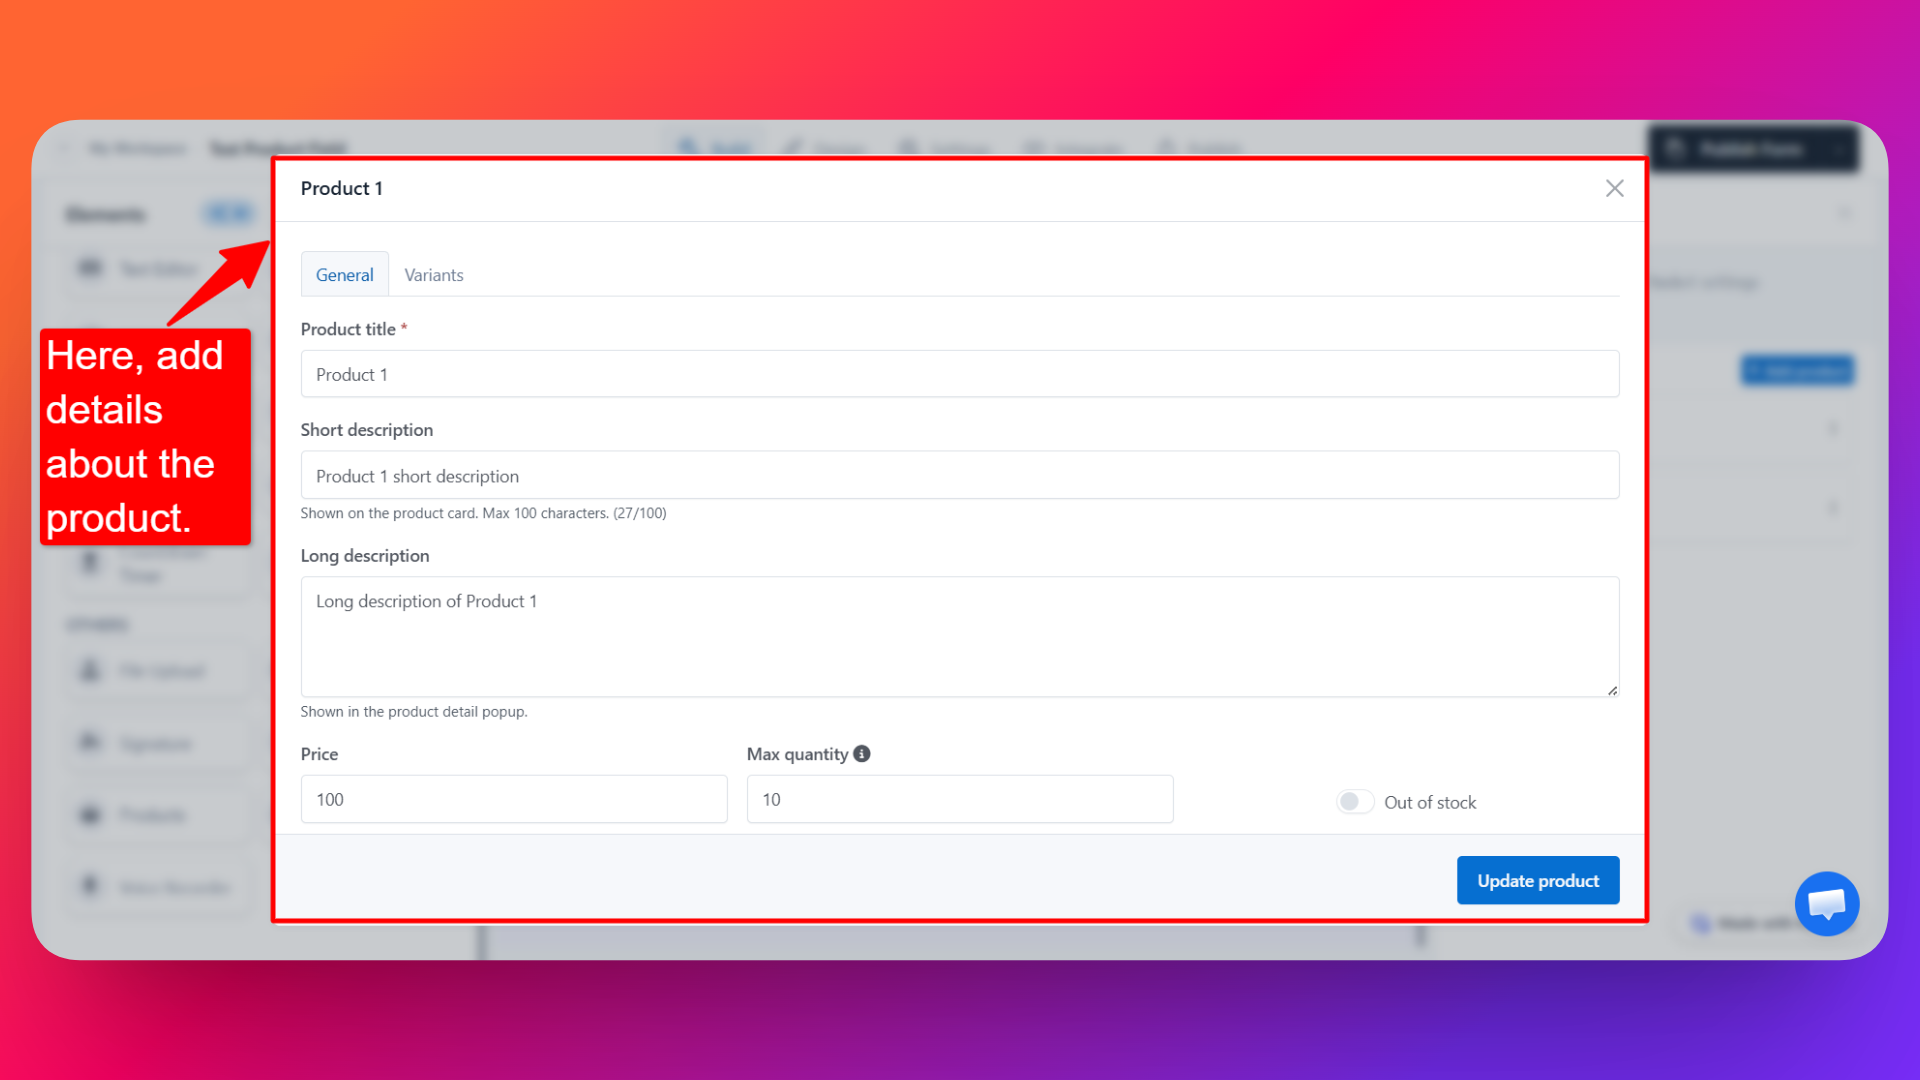
1. Product Title
- The name customers will see on the product card.
- Example: "Chocolate Fudge Cake", "Early Bird Ticket", "Logo Design Package".
2. Short Description
- A one-line summary shown on the product card.
- Keep it brief — it's the line that helps a customer decide at a glance.
- Example: "Rich, eggless, serves 8."
3. Long Description
- The full details, shown when a customer opens the product.
- Use it for ingredients, dimensions, what's included, delivery timelines, or terms.
4. Price
- The price of a single unit of this product.
- Enter only the number — the currency and symbol position are set later, in Basket Settings.
- If the product has variants with their own prices, this price acts as the base price (more on that below).
5. Maximum Units One Person Can Order
- Set a per-customer limit for this product.
- Enter 0 for unlimited ordering.
- Handy for limited stock, "one per household" offers, or ticket caps.
6. Out of Stock
- Turn this toggle on to show the product as Out of Stock on the form.
- The product stays visible in your catalog, but customers can't add it to the cart.
- Better than deleting the product — you keep all its details ready for when stock returns.
7. Images
- Add up to 5 images for the product.
- The first image is used as the card image, so make it your clearest, best-looking shot.
- The remaining images give customers a closer look before they buy.
- Use well-lit photos with the product filling most of the frame — good product images do more for conversions than any other setting on this page.
🎨 Variants Tab (Sizes, Colors, and Other Options)
Use variants when the same product comes in more than one option — sizes, colors, flavors, materials, durations, and so on.
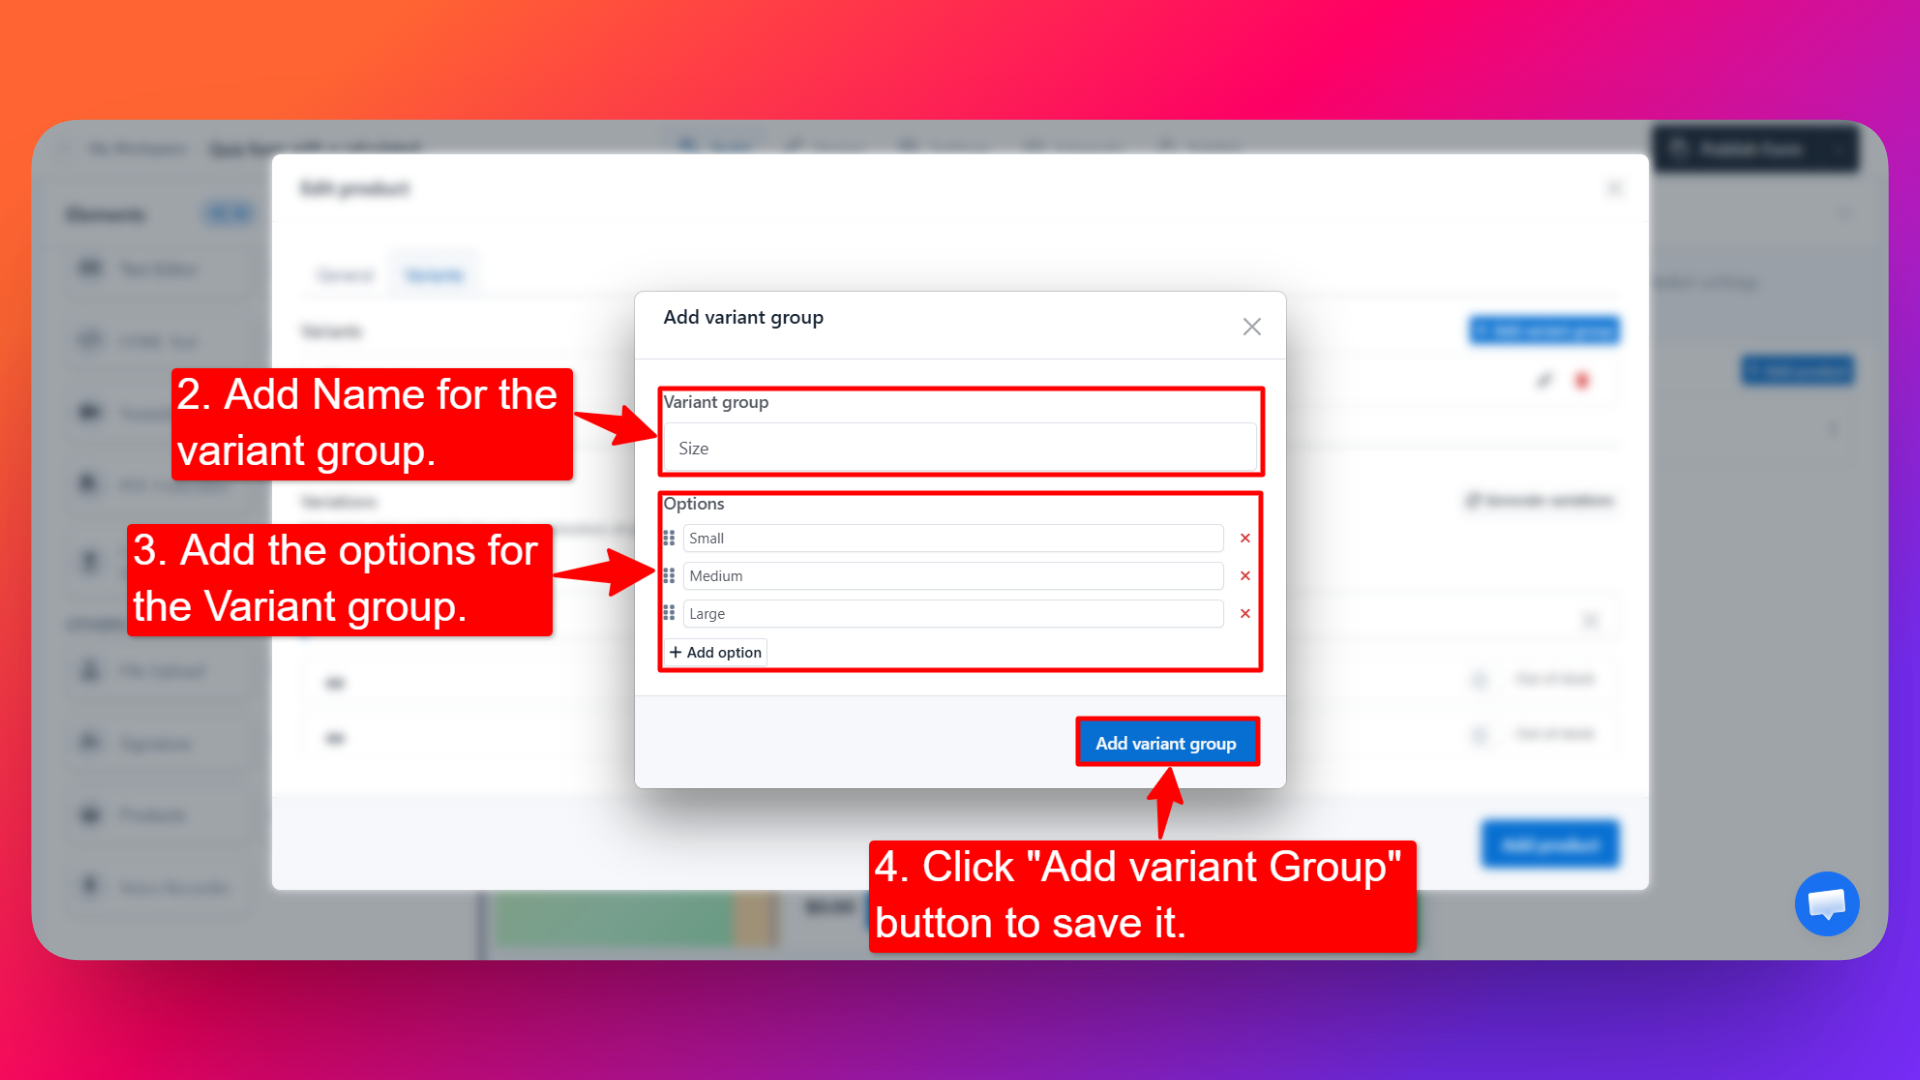
Step 1 — Click "Add Variant Group"
A panel opens where you define one group of options.
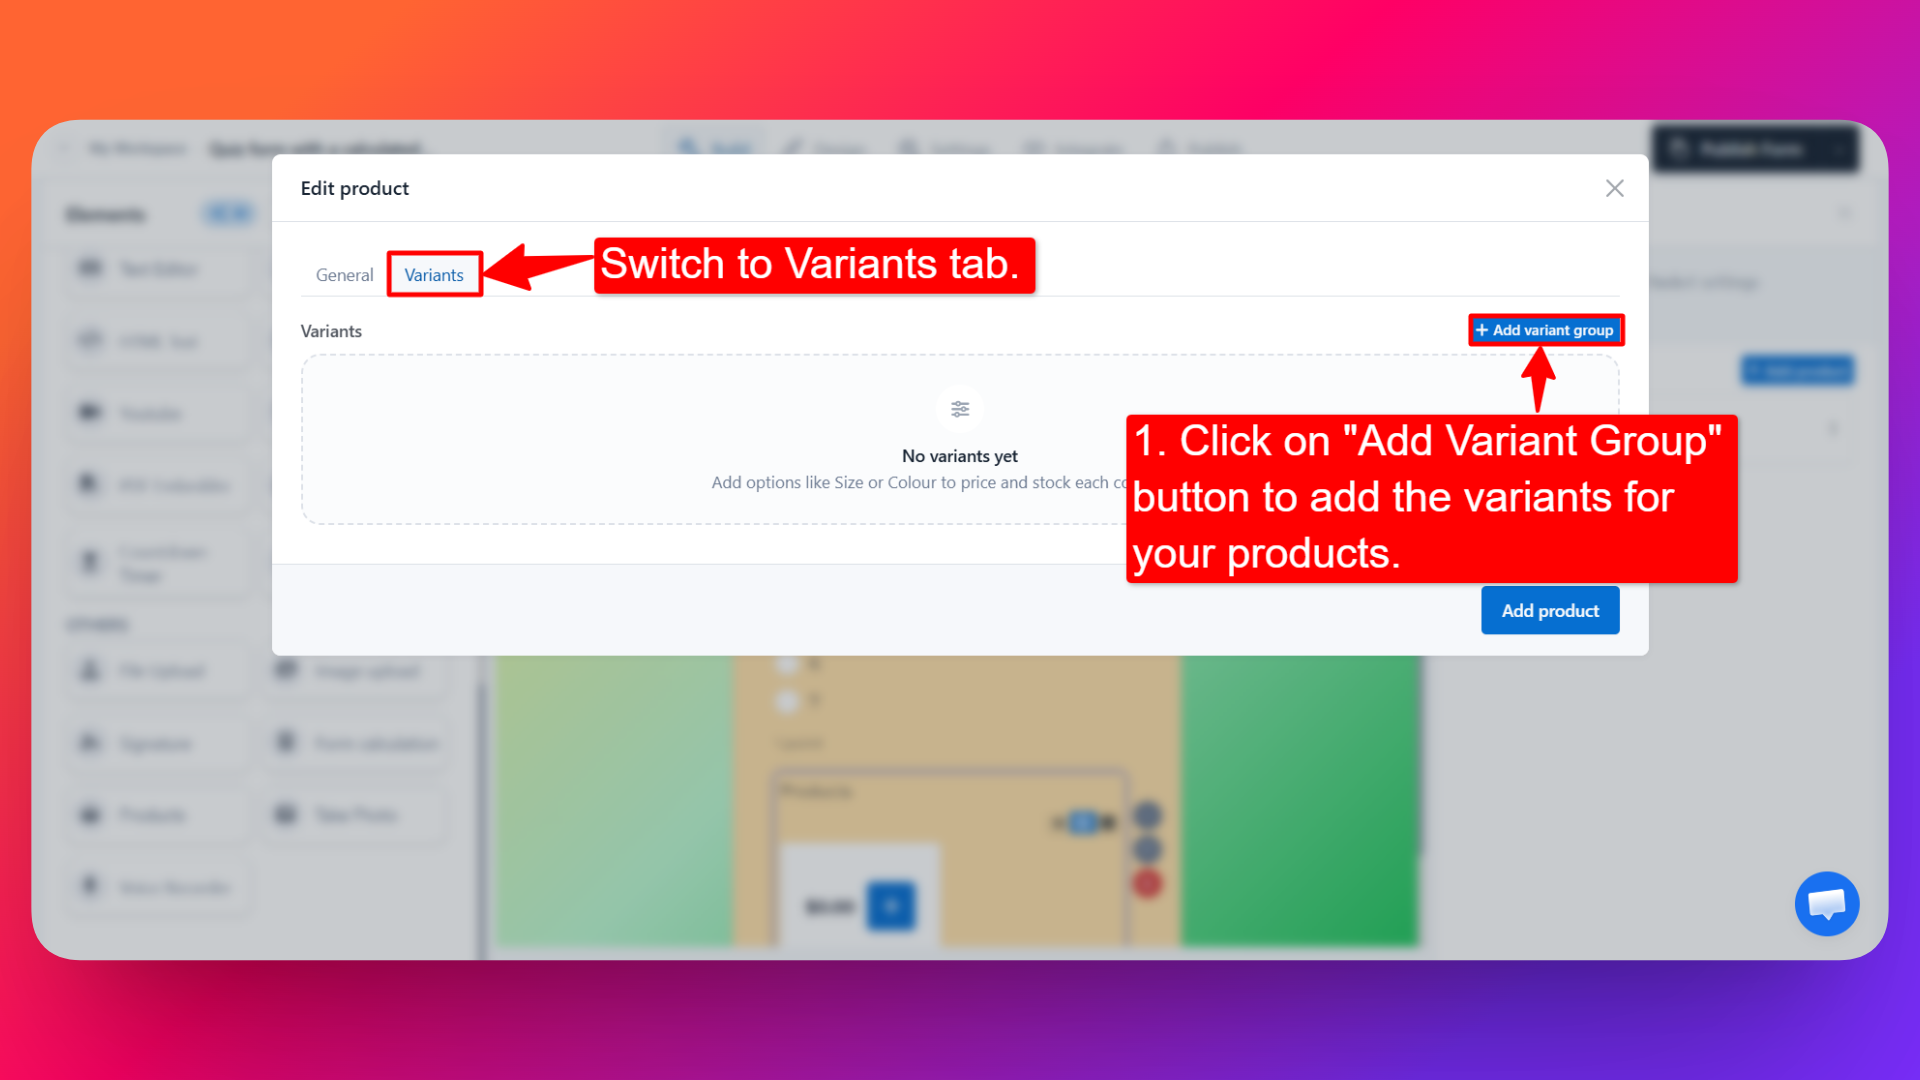
Step 2 — Name the variant group
- The group is the type of choice.
- Examples: "Size", "Color", "Flavor", "Duration".
Step 3 — Add the options for that group
- The options are the choices inside the group.
- Examples: Small, Medium, Large — or Vanilla, Chocolate, Strawberry.
Step 4 — Click "Add Variant Group" to save it
Once saved, the group appears in the list, where you can edit or delete it at any time.
You can add more than one variant group to a single product.
How Variant Combinations Work
When a product has more than one variant group, FormNX automatically creates a row for every possible combination of the options you added.
For example, a T-shirt with a Size group (Small, Medium, Large) and a Color group (Black, White) produces six combinations:
| Size | Color |
|---|---|
| Small | Black |
| Small | White |
| Medium | Black |
| Medium | White |
| Large | Black |
| Large | White |
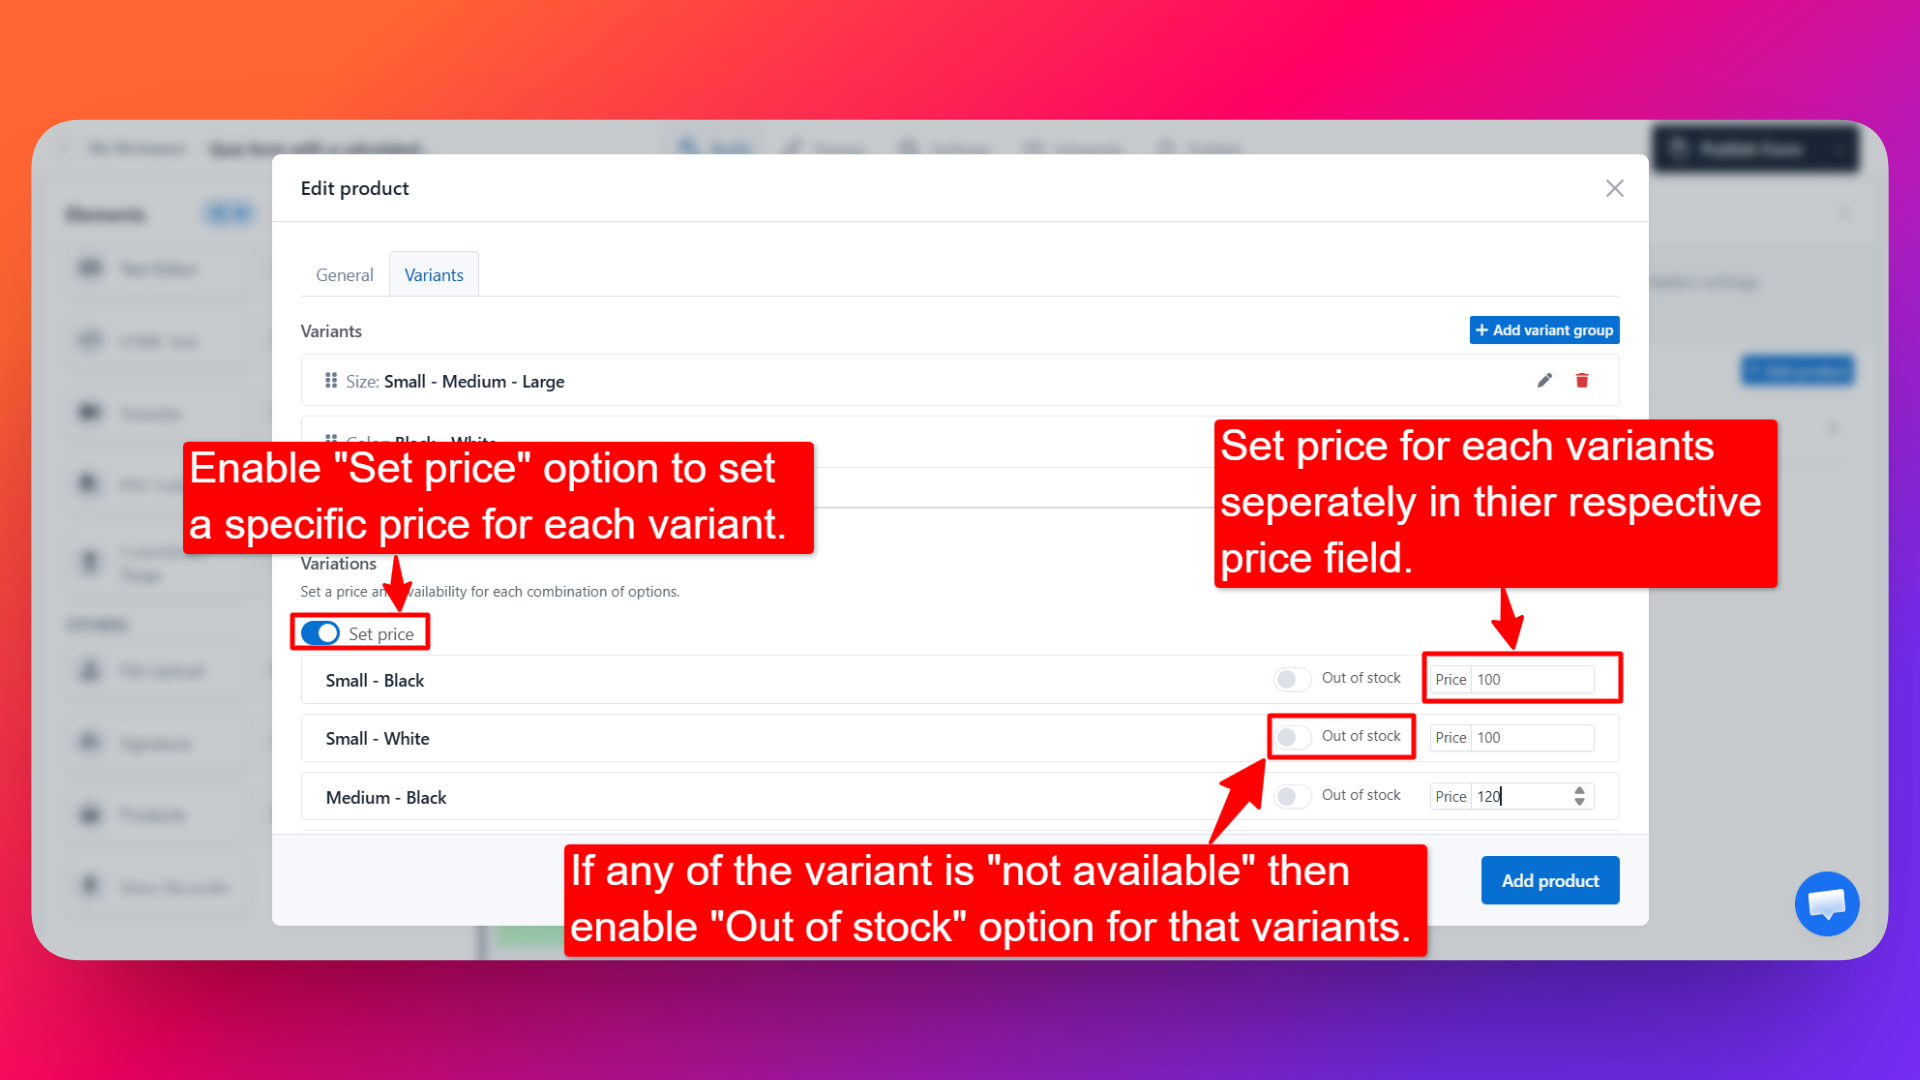
Each combination gets its own row under Price and availability, where you can control two things:
- Set Price — turn this on to give that specific combination its own price. This is how you charge more for a large size or a premium color. Combinations left switched off simply use the product's base price.
- Out of Stock — mark an individual combination as unavailable. Customers can still buy the product in other combinations; only that one is blocked.
Combinations multiply quickly — 3 sizes × 3 flavors × 2 packaging options is already 18 rows to price. Start with the option groups customers genuinely choose between, and add more only when you need them.
✏️ Editing, Duplicating, and Deleting Products
Every product in your list has three actions:
- Edit — reopen the product and change any detail.
- Duplicate — create an identical copy. This is the fastest way to add a similar product: duplicate it, then change the title, price, and image instead of starting from scratch.
- Delete — remove the product from the catalog permanently.
Add as many products and variants as your form needs.
🧾 Tab 3 — Basket Settings
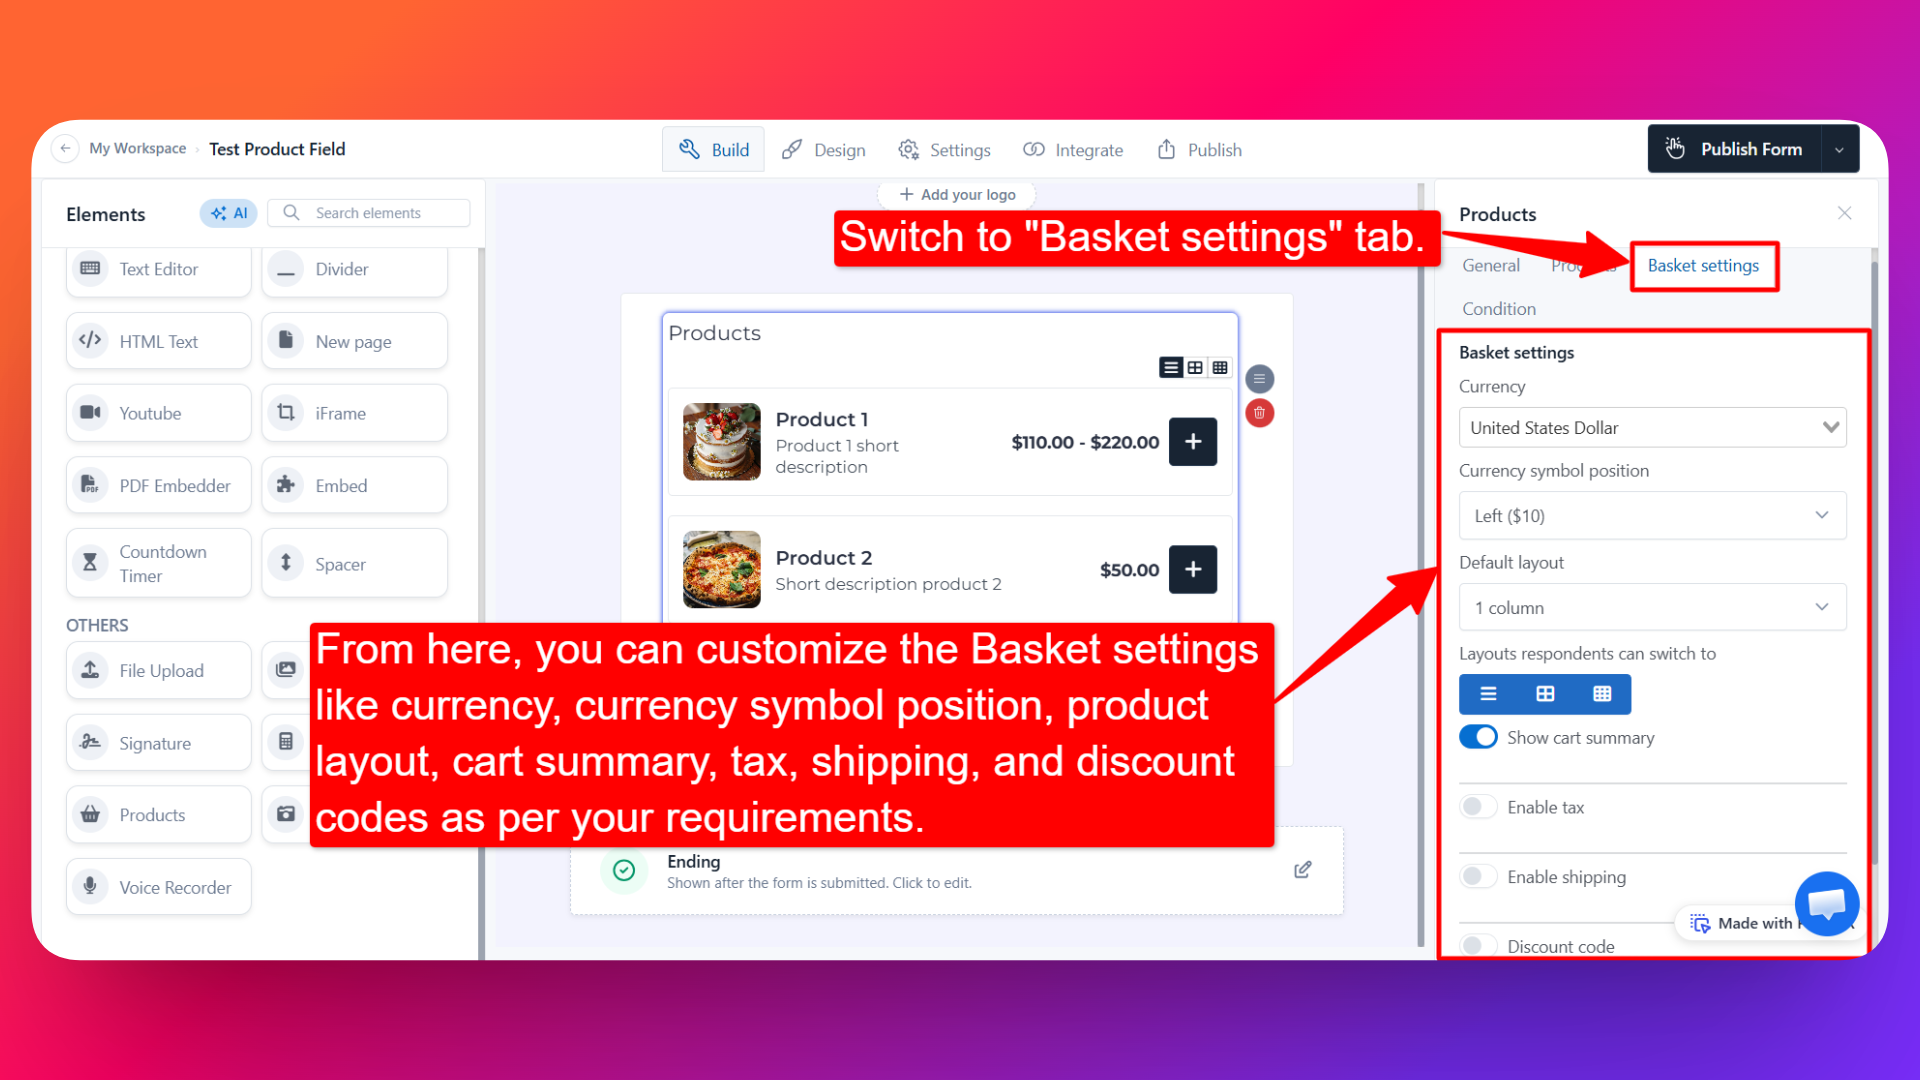
These settings apply to the whole cart, not to individual products.
💱 Currency
- Choose your selling currency from the dropdown (for example, US Dollar, Pound Sterling, Euro).
- All product prices, tax, shipping, and the cart total use this currency.
💲 Currency Symbol Position
Choose where the symbol appears next to your prices:
- Left —
$10 - Right —
10$
Pick whichever matches how your customers normally read prices in your market.
🧱 Default Layout Options
You'll see icons for 1 column, 2 columns, and 3 columns. These are the layouts respondents can switch to while browsing your products.
- Select more than one layout → customers see layout switcher icons on the form and can choose the view they prefer.
- Select only one layout → products always appear in that layout, and no switcher is shown.
Which to choose:
- 1 column — big product cards. Best for a handful of premium items where the image and description need to sell.
- 2 columns — a balanced middle ground for most catalogs.
- 3 columns — compact cards that let customers scan a longer product list quickly.
Mobile screens will naturally stack the products, so don't worry about small screens when you pick a layout.
🛍️ Show Cart Summary
- Toggle this on to display a running summary of the cart — items added, quantities, and the total.
- Keeping it on is usually the right call: customers who can see their total are far less likely to abandon the form at the payment step.
🧮 Enable Tax
Toggle this on if you need to charge tax on the order. Two settings appear:
1. Tax Rate (%)
- Enter your tax percentage — for example,
20for 20%.
2. Tax Mode
- Add on top of the total — the tax percentage is calculated on the cart total and added to it. Customers see the tax as a separate line, and the final amount is higher than the sum of the product prices.
- Already included in prices — your product prices already contain the tax. Nothing extra is added; FormNX simply shows how much of the total is tax.
Choose whichever matches how you quote prices in your country. If you're unsure, check with your accountant — this setting affects what customers are actually charged.
🚚 Enable Shipping
Toggle this on to add a delivery charge to the order. Two settings appear:
1. Shipping Amount
- The flat delivery charge added to every order.
2. Free Shipping Over
- Enter the order value above which shipping becomes free.
- Example: set it to
50and any cart over 50 ships free — a proven way to nudge customers into adding one more item. - Leave this field empty to always charge shipping.
🎟️ Discount Code
Toggle this on to let customers enter a promo code at checkout. A Add Discount Code button appears — click it to open the discount panel:
1. Code
- Click the dice icon 🎲 to generate a random code, or type your own custom code such as
WELCOME26orSUMMER26. - Custom codes are easier to promote; random codes are better for one-off, single-customer offers.
2. Discount
- The value of the discount, entered as a number.
3. Discount Type
- Percent — that percentage is taken off the total. A discount of
10with type Percent removes 10% of the total. - Fixed — that exact amount is taken off the total. A discount of
10with type Fixed removes 10 from the total (total − 10).
4. Usage Limit
- Toggle this on to cap how many times the code can be used.
- Enter the total number of times the discount code may be redeemed.
- Leave it empty for unlimited redemptions.
5. Expiry Date
- Toggle this on to set an end date for the code.
- After that date the code expires, and customers will no longer be able to apply it.
Click the Add Discount button at the bottom to save the code. You can create several codes — one for a newsletter, one for a partner, one for a seasonal sale — and each keeps its own limits and expiry.
🚀 Publishing Your Form
Once your products and Basket Settings are ready, click the Publish Form button to save your form.
Before you share it, open the live form and place a test order yourself. Check that:
- Every product shows the right price and images.
- Variant combinations charge what you expect.
- Tax and shipping appear correctly in the total.
- Your discount code applies and reduces the total as intended.
- The payment step completes successfully.
Five minutes of testing here saves you from refunding mispriced orders later.
👤 How It Works for Your Customers
When customers open your form:
- They see your product catalog in the layout you set — and can switch layouts if you enabled more than one.
- Clicking a product opens its full details, images, and any variant options such as size or color.
- They pick their variant, set the quantity, and add the item to the cart.
- Out-of-stock products and out-of-stock combinations are clearly marked and can't be added.
- If a per-person limit is set, they can't order more than that number of units.
- The cart summary keeps a running total as they shop — including tax and shipping.
- They can enter a discount code, and the total updates instantly.
- They fill in the rest of your form (name, email, delivery address, notes) and pay the cart total in one go.
💡 Common Use Cases
- Bakery and food order forms — Sell cakes and meals with size, flavor, and add-on variants. See bakery order form templates.
- Merchandise and apparel stores — Offer T-shirts and hoodies in multiple sizes and colors, each with its own price and stock.
- Event ticket sales — Sell early bird, standard, and VIP tickets with per-person purchase limits.
- Fundraisers and charity shops — Sell branded goods alongside a donation, all in one form.
- Service packages — Present Basic, Standard, and Premium tiers as products and take payment on the spot.
- Digital products — Sell templates, presets, ebooks, and courses without setting up a full e-commerce platform.
- Wholesale and B2B order forms — Let stockists order across a product list with quantity limits and a trade discount code.
- School and club orders — Collect uniform, kit, or trip payments with sizes handled as variants.
❓ Frequently Asked Questions
Is the Products field available on the free plan?
No. The Products field is a Pro feature - you'll need a Pro plan to add it to a form. It's available on every Pro plan. Note that this is separate from payments in general: FormNX can collect payments through Stripe on the free plan, but building a browsable product catalog with variants, a cart, tax, shipping and discount codes needs Pro.
Do I need a separate e-commerce platform to use this?
No. The Products field handles the catalog, the cart, and the totals inside your form. You only need a connected payment gateway to collect the money — see the Stripe and PayPal integration guides.
How is this different from using a dropdown and a calculation field?
A dropdown lists text options; the Products field shows a real product card with images, descriptions, variants, stock status, and quantity controls, then works out tax, shipping, and discounts on its own. If you only need a simple price total from a few answers, the calculation form approach still works well — but for anything that looks like a shop, use Products.
Can I hide certain products from certain customers?
Yes — use conditional logic to show or hide the Products field based on an earlier answer. For example, ask which region a customer is in, and only show the Products field once they choose a region you deliver to.
What happens if I mark a product as out of stock after someone has already ordered?
Existing submissions aren't affected. The product simply stops accepting new orders from the moment you save the change.
Can I charge different prices for different sizes?
Yes. Add a variant group for Size, then turn on Set Price for each combination you want priced differently. Combinations without a set price use the product's base price.
Does the discount code apply before or after tax and shipping?
The discount is applied to the cart total, and tax and shipping are then reflected in the final amount shown to the customer. Always run one test order with your code applied so you can see exactly what customers will be charged.
Can I use more than one discount code on the same form?
Yes. Create as many codes as you need, each with its own discount value, usage limit, and expiry date.
Where do I see what people ordered?
Every order arrives with the rest of your form responses in your submissions list, showing the products, variants, and quantities chosen alongside the customer's details.
The Products field gives you a complete, no-code storefront inside a form — browse, choose, add to cart, and pay, without a single line of code.
Related features: online payment form · calculation fields · conditional logic forms · e-commerce form templates