✍️ Signature
Related feature: e-signature form builder
The Signature element in FormNX lets your users sign your form digitally — directly inside the browser. They can draw their signature with a mouse, finger, or stylus, and you can also let them type their name or upload an image of their signature. It's the easiest way to collect legally meaningful e-signatures for agreements, consent forms, contracts, and approvals without sending PDFs back and forth.
📌 How to Add the Signature Field to Your Form
Follow these simple steps:
- Open the Form Builder.
- On the left hand side, you'll see the Elements section.
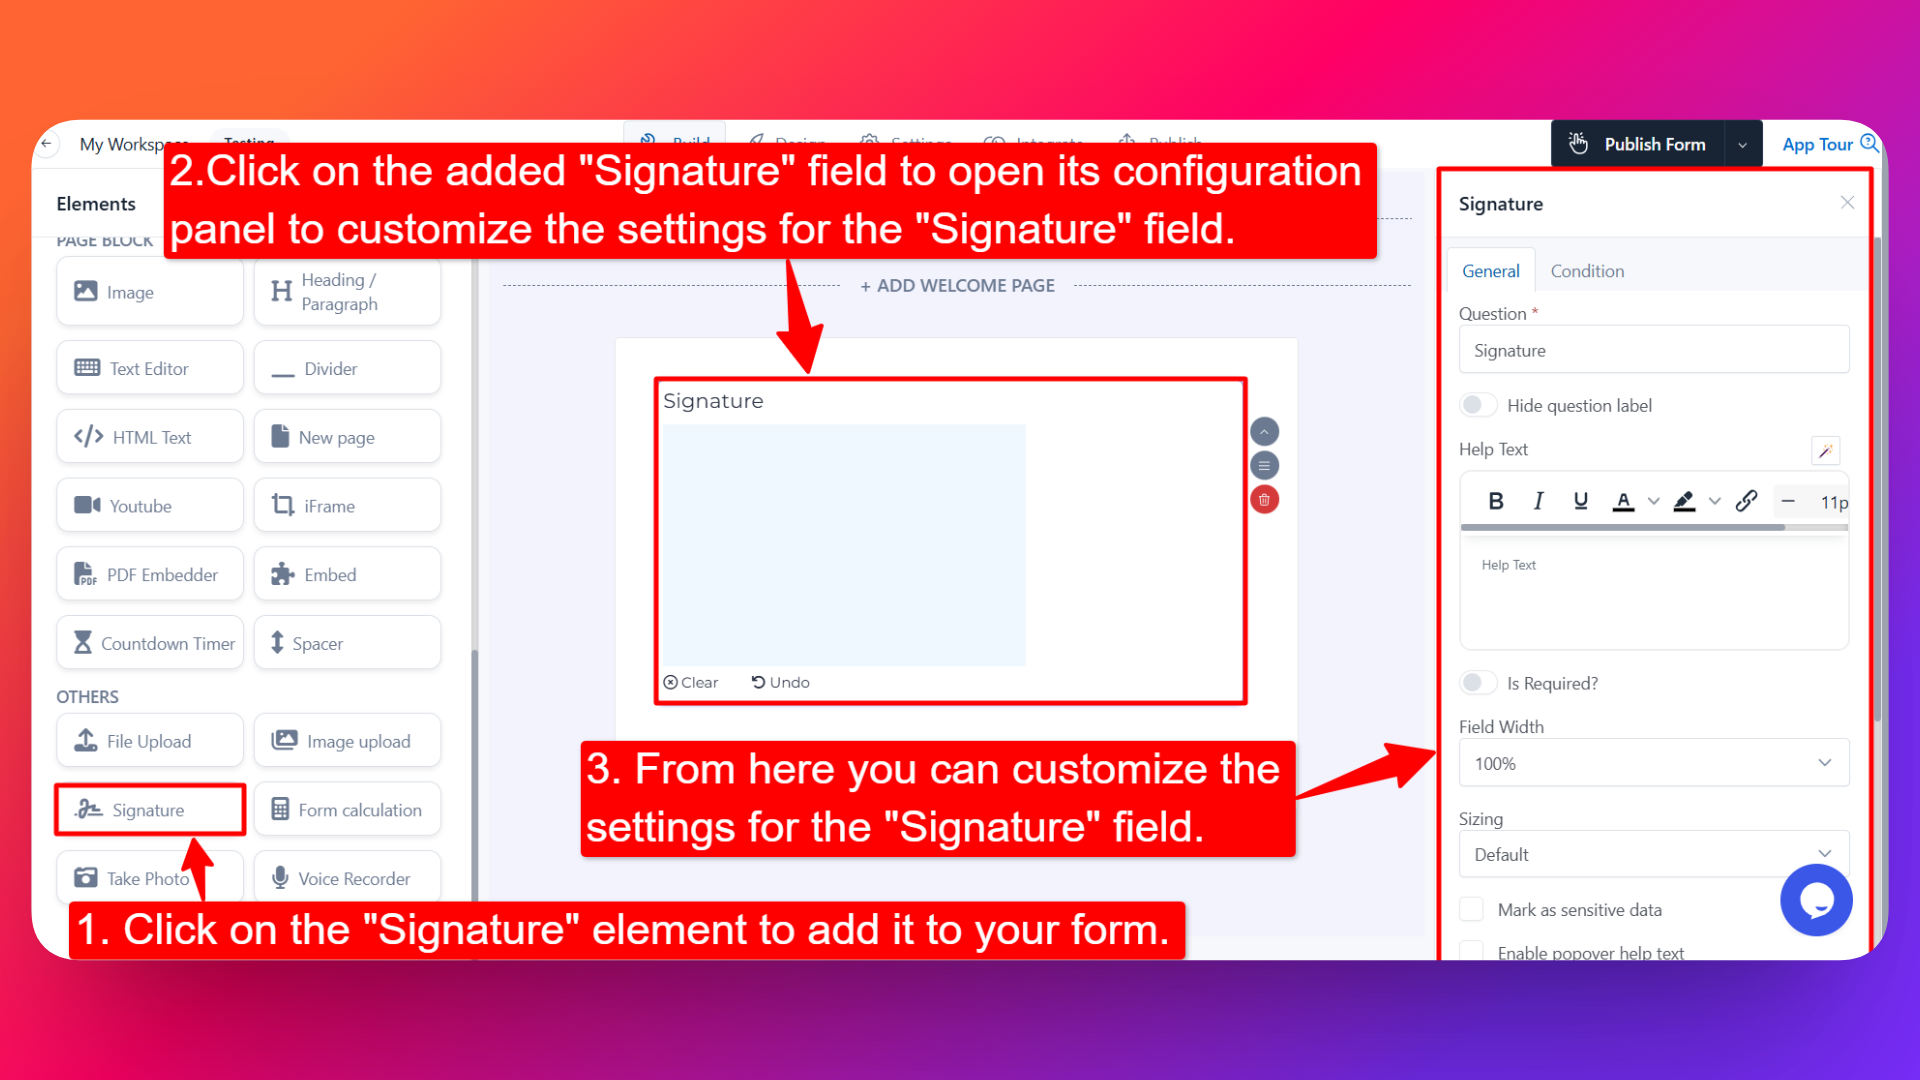
- Find the Signature element.
- Drag and drop the element onto your form OR click on the element to add it automatically.
Once added, the Signature field will appear in your form layout, ready to be customized.
⚙️ How to Configure the Signature Field
To customize the field:
- Click on the Signature element in your form.
- The configuration panel will open on the right hand side.
You can configure the following options:
- Question Label ✏️
- Add the question or label that users will see for this field.
- Example:
- "Please sign here"
- "Authorized signature"
- Hide Question Label 🙈
- Enable this option to hide the question label while keeping the signature pad visible.
- Help Text 📝
- Add a short instruction or hint below the field to guide users.
- Example: "Use your mouse or finger to draw your signature in the box below."
- Required ✅
- Enable the Required option to make the field mandatory.
- Users won't be able to submit the form unless they provide a signature.
- Recommended for any agreement, consent, or contract use case.
- Field Width 📐
- Adjust the width of the field to control how it appears on the form.
- Sizing 📏
Pick the size of the signature pad to match your form layout:
- Full width (Recommended) — The signature pad stretches across the whole field, giving users plenty of room to sign. This is the default for new signature fields.
- Small — A compact signature pad.
- Medium — A slightly larger signature area, gives users more room to sign comfortably.
- Large — The biggest fixed-size pad, ideal when the signature is the form's main focus (contracts, legal documents).
On phones and in narrow columns, the pad automatically shrinks to fit the screen.
- Ways to sign ✍️
Choose how your users can sign:
- Draw — Always on. Users draw their signature with a mouse, finger, or stylus.
- Type name — Users type their name and pick one of several handwriting-style fonts. Their name appears in the signature pad as a signature.
- Upload image — Users upload a picture of their signature (PNG, JPG, or WebP, up to 5 MB). Handy for anyone who already has a scanned signature or prefers to sign on paper and take a photo.
To turn them on, tick Type name and/or Upload image. Both are off by default.
Type name and Upload image are available for Pro subscribers. Upgrade to a Pro plan to unlock them. Drawing a signature is available on every plan, including Free.
- Sensitive Data 🛡️
- Mark the field as Sensitive Data to handle the response with extra care (such as masking it in submissions).
- Recommended for signatures since they are legally meaningful identifiers.
- Field name 🏷️ (in the Advanced section)
- Add a unique field name (used internally for integrations, exports, and conditional logic).
- Popover Help Text 💡
- Enable this option to show your help text inside an info icon next to the field.
- When users click on the info icon, the popover will appear with the help text you added.
- Keeps your form clean while still giving users access to extra guidance when they need it.
👤 How It Works for Users
When users open the form:
- They'll see a blank signature pad with the label and any help text you've configured.
- They can sign by:
- Mouse — Click and drag inside the pad to draw their signature.
- Finger or stylus — Sign directly on touch-enabled devices like phones and tablets.
- If you've turned on Type name or Upload image, they'll see Draw, Type, and Upload tabs above the pad and can pick the way they prefer:
- Draw — Draw the signature in the pad.
- Type — Type their full name, then choose a signature style. The pad shows their name in that style.
- Upload — Choose an image of their signature from their device. On phones, they can also take a photo with the camera. The image appears in the pad.
- They can clear the pad and re-sign if they make a mistake. Switching to a different tab starts a fresh signature.
- However they sign, you receive the signature as an image in your responses, PDFs, and integrations — exactly like a drawn signature.
- If popover help text is enabled, users can click the info icon to see additional guidance.
- If the field is marked as required, they must sign before submitting the form.
💡 Common Use Cases
- Consent and waiver forms — Capture legally binding agreement for activities, services, or media releases.
- Contracts and service agreements — Collect e-signatures for client contracts and proposals.
- Employee onboarding forms — Get sign-off on company policies, NDAs, and offer letters.
- Healthcare consent forms — Capture patient consent for procedures, telehealth, or data sharing.
- Delivery confirmations — Collect signature confirmation for deliveries and pickups.
- Permission slips — Get parent/guardian sign-off for school activities and field trips.
- Authorization forms — Capture authorization for transactions, account changes, or approvals.
The Signature field turns your form into a complete, paperless workflow — no printing, scanning, or follow-up emails required.