🔗 Embed Forms in FlexiFunnels
You can add any type of FormNX form to your FlexiFunnels landing pages and funnel pages. Your form keeps its own design, and every response is saved in your FormNX account.
You don't need a plugin, and you don't need to know how to code. You only copy one code from FormNX and paste it into FlexiFunnels.
Before You Start
Keep these two things ready:
- A published FormNX form that you want to show on your page.
- A FlexiFunnels project and page where you want the form to appear.
Your FormNX form must be live before you embed it. If the form is not published, visitors will not be able to see or fill it out on your FlexiFunnels page.
How Embedding Works in FlexiFunnels
FlexiFunnels builds every page in three layers:
- Section – a full horizontal band of the page.
- Row – splits a section into columns.
- Element – the actual content your visitors see, such as a heading, image, button, or code.
To show a FormNX form, you add one special element called the Custom Code element. It is an empty box where you paste the code you copied from FormNX. When the page goes live, that box turns into your form.
Ways to Add Your Form
You can add your FormNX form to FlexiFunnels in three ways. Choose the one that fits your page:
| Method | What visitors see | Best for |
|---|---|---|
| Embed the form (Recommended) | The form appears directly on the page | Contact, registration, survey, feedback, and application forms |
| Popup form | The form opens in a popup window | Lead capture, offers, exit-intent messages |
| Button with form link | A button that opens your form in a new tab | Long forms, or when you want a cleaner page |
Method 1: Embed the Form on Your Page (Recommended)
With this method, the form sits right inside your page. Visitors fill it out and submit it without leaving your funnel.
Step 1: Copy the Embed Code from FormNX
1. Open your form in the Form Builder and go to the Publish tab.
2. Click the Embed in your website option.
3. Click the </> Copy code button to copy your form's embed code.
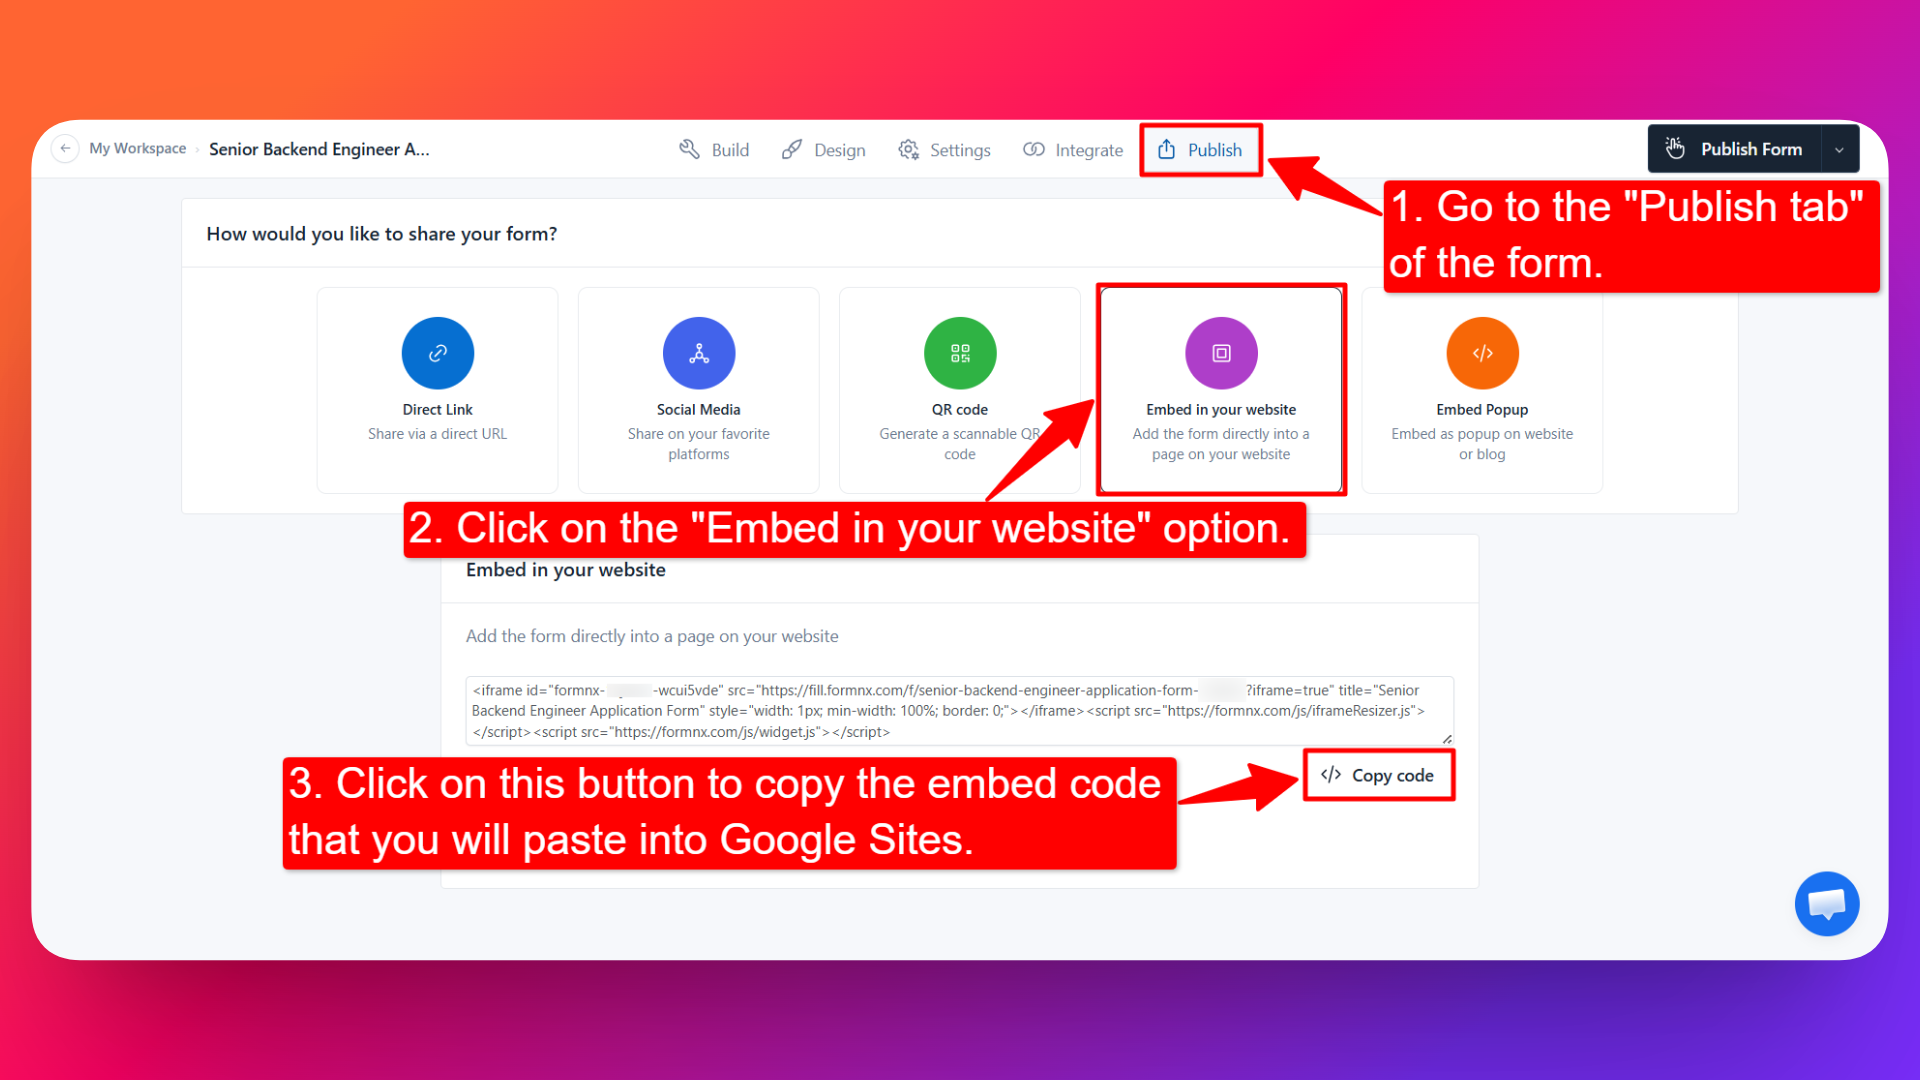
Copy the complete code. If you copy only a part of it, the form will not load on your page.
Step 2: Add the Code to Your FlexiFunnels Page
1. Log in to your FlexiFunnels account and open the Project that contains your page.
2. Click Edit Page to open the page in the Landing Page Editor.
3. Make sure you have a Row with a column on the page where the form should appear. An element cannot be placed in an empty section.
4. Click the + (plus) icon in the left sidebar to open the panel.
5. Select the Components tab, then click Elements.
6. Find the Custom Code element and drag it into the row where you want the form.
7. Double-click the Custom Code element. A code editor pop-up will open.
8. Paste the embed code you copied from FormNX into the blank box.
9. Click SAVE to save the code.
10. Click PUBLISH at the top of the editor to make the page live.
FlexiFunnels does not run custom code inside the editor. The editor is only a building view, so the Custom Code element will look like an empty box there.
This is normal. Open your published live page to see your form working.
Step 3: Check Your Live Form
1. Open the published page URL in your browser (not the editor and not the preview).
2. Fill in the form and submit a test entry.
3. Go to the All responses section of that form in FormNX and confirm your test entry is there.
That's it. Your form is now live on your FlexiFunnels page, and every response goes straight to your FormNX account.
You only need to paste the embed code once. When you edit your form later, the form on your FlexiFunnels page updates on its own — you don't have to copy the code again.
Method 2: Show Your Form as a Popup
A popup form opens on top of your page. You can set it to open on a button click, after a delay, on scroll, or when a visitor is about to leave.
Step-1: In FormNX, open your form and go to the Publish tab.
Step-2: Open the Embed Popup section and choose your trigger option.
Step-3: Click Copy Code.
Step-4: In FlexiFunnels, open your page in the editor and add a Custom Code element (follow Step 2 above).
Step-5: Double-click the element, paste the popup code, and click SAVE.
Step-6: Click PUBLISH, then open the live page to test the popup.
If you change a popup trigger option later (button, delay, scroll, or exit), you must copy the code again from FormNX and paste it back into the Custom Code element.
Learn more about popup triggers in Embedding as Popup forms.
Method 3: Add a Button That Opens Your Form
If you prefer a clean page, you can add a button that sends visitors to your form instead of showing the form on the page.
Step-1: In FormNX, open your form, go to the Publish tab, and copy the Form Link (public URL).
Step-2: In FlexiFunnels, open your page in the Landing Page Editor.
Step-3: Click the + (plus) icon → Components → Elements, then drag the Button element into your row.
Step-4: Click the button and open its settings.
Step-5: Enter your button text, for example:
- Register Now
- Contact Us
- Book Your Seat
- Fill Out the Form
Step-6: Paste your FormNX Form Link into the button's link field.
Step-7: Click PUBLISH and test the button on the live page.
Show the Same Form on Every Page
If you want one form or popup on all pages of a project, you can add the code once instead of adding it to each page.
Step-1: Log in to your FlexiFunnels dashboard.
Step-2: Go to Project Settings.
Step-3: Select General Code.
Step-4: Paste your FormNX embed code in the right section:
| Section | Use it for |
|---|---|
| Head | Meta tags, fonts, and verification codes |
| Body Start | Code that must run as early as possible |
| Body End | Popup and chat-style codes that load after the page |
For a FormNX popup form, Body End is usually the best choice.
Step-5: Click Save/Update and wait for the confirmation message.
General Code can take a few minutes to appear on your live pages. Always test on a published page, and clear your browser cache or use an incognito window to see the latest version.
Important: Don't Use "Parse Code" for FormNX Forms
FlexiFunnels has a feature called Parse Code. It is easy to confuse, so here is the simple difference:
- Parse Code is used to connect a FlexiFunnels form to an email autoresponder using raw HTML. It only accepts raw HTML form code.
- FormNX forms are embedded with an embed code, which Parse Code does not support.
👉 To add a FormNX form, always use the Custom Code element (Method 1) or the Button element (Method 3).
Tips for a Better Looking Form
- Place the form inside a row with a column. Elements cannot be dropped into an empty section.
- Give the form enough space. If your form has many fields, place it in a full-width row so visitors don't have to scroll inside a small box.
- Test on mobile. Open the live page on your phone to check that the form fits the screen properly.
- Republish after every change. Any edit you make in the FlexiFunnels editor goes live only after you click PUBLISH again.
- Only paste code you trust. A wrong or broken snippet can affect how your page loads.
Troubleshooting
| Problem | What to do |
|---|---|
| The form shows as an empty box in the editor | This is normal. Custom code never runs inside the editor. Open the published live page instead. |
| The form does not appear on the live page | Check that you clicked SAVE in the code pop-up and PUBLISH on the page. Then refresh the page. |
| The form still shows an old version | Clear your browser cache or open the page in an incognito window. |
| Only part of the form loads | You may have copied an incomplete code. Copy the full embed code again from the Publish tab in FormNX and paste it fresh. |
| The popup does not open | Confirm you copied the code again after changing the trigger option, and that you pasted the Embed Popup code, not the standard embed code. |
| Responses are not showing | Test on the published page, not the editor preview. Responses only save from a live form. |
FAQs
Can I add a FormNX form to FlexiFunnels?
Yes. Copy the embed code from the Publish tab of your form, then paste it into a Custom Code element on your FlexiFunnels page and publish the page.
Where do I find my form's embed code?
Open your form in the form builder, go to the Publish tab, and click Embed in your website. The </> code shown there is your embed code.
Which FlexiFunnels element should I use?
Use the Custom Code element. You'll find it under + → Components → Elements in the Landing Page Editor.
Why is my form not visible inside the FlexiFunnels editor?
FlexiFunnels does not run custom code in the editor view. Your form will appear only on the published live page.
Do I need to paste the code again after editing my form?
No. The embed code always points to your live form, so any change you make in the form builder appears on your FlexiFunnels page automatically.
Where do I see the form responses?
All responses are saved in FormNX, in the All responses section of that form. They are not stored in FlexiFunnels.
Can I show the form on all pages of my funnel?
Yes. Add the code once under Project Settings → General Code instead of adding a Custom Code element to each page.
Can I use FlexiFunnels' Parse Code option for my FormNX form?
No. Parse Code only works with raw HTML form code from email autoresponders. Use the Custom Code element for FormNX forms.
Can I open my form in a new tab instead of embedding it?
Yes. Copy your form's public Form Link from the Publish tab, add a Button element in FlexiFunnels, and paste the link into the button.
Which method is better: embed, popup, or button?
Embedding is best for most pages because visitors can complete the form without leaving your funnel. Use a popup for lead capture and offers, and use a button when your form is long or you want a cleaner page.
Related docs: Embedding in a Website · Embedding as Popup forms · Embed forms in WordPress · Add Forms to Google Sites · Embed Forms in Carrd